
A lidded package is a faceplate project. It requires that you square both the box's perimeter and sides. The lid and the box are usually made from the same 2-in thick seasoned wooden block. You will need to cut a foot across one end of the wood in order to square the base. Because the final box will rest on the base alone, the center must be slightly recessed. The recess can be cut with a small tool.
End grain hollowing in lidded containers: Challenges
One of the most difficult tasks in box-making involves hollowing end grains. This process is difficult and involves specialist tools. A simple hollowing tool can be made for $30 using an old screwdriver. You can also buy a gouge to use for this purpose. The key to hollowing end grains is to not use sharp edges. A gouge should have a flat, long bevel with a round fingernail shape.
It is five times harder to hollow end grain than side grain. This is one of the greatest challenges in hollowing end grain. It can also be susceptible to tearing. Experiential bowl turners can have problems hollowing end grain. Changing from a gouge to a scraper can help overcome these problems, but it is worth noting that lidded boxes often require special end grain tools.
Methods to create a snap-fit lidded bag
A snap-fit lidded box is a type of container with a sliding closure. These boxes may contain liquid or other liquid-filled container. These boxes are simple to assemble and disassemble. They can also be automated for lower assembly costs. There are many types available. Therefore, engineers should select the best snap-fits based on their cost, strength, failure rate, and other factors. Below is a list of different types of snapfits.
The upper portion of a 3-D printed snap-fit lidded cardboard box should be designed with the correct measurements. The base must be in line with the upper portion. The lid should stay in place when seated. In order to ensure a proper fit, the lid must be tightened. You should remove wood slowly to achieve this. Although it can be difficult, this process is worthwhile.
Wooden lidded box
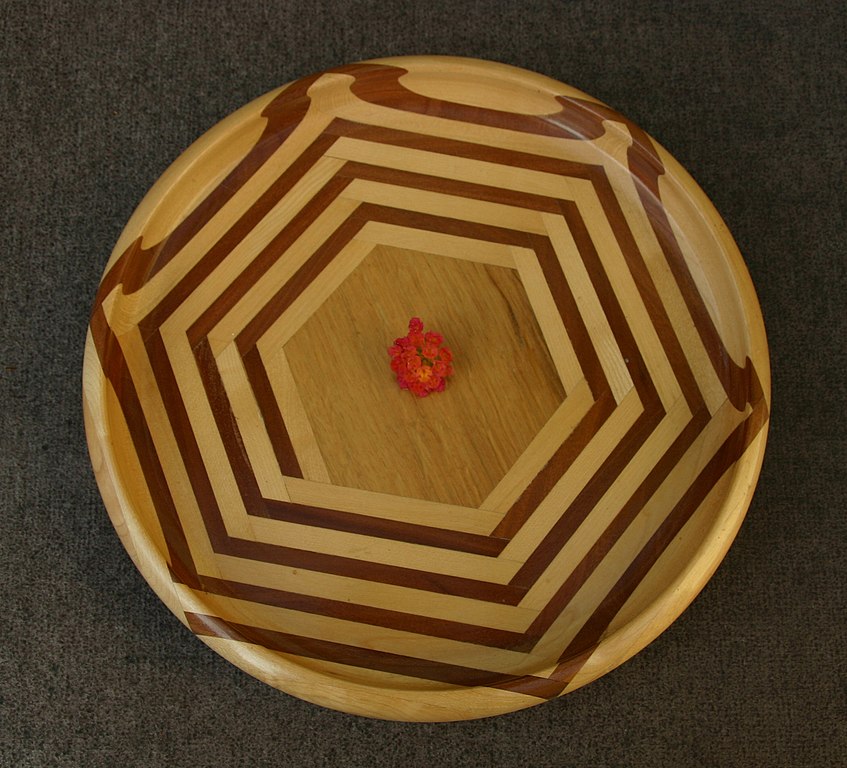
You can salvage wood from trees to make the different types of wood used in lidded boxes. Once a tree is harvested, the wood is cured to prevent cracks and rough turned to form a general shape. The wood undergoes another drying process, which makes it shrink. Depending on the design, the lidded box can also be made from different types of wood. The lid is usually made up of two pieces. One is smaller than another.
A lathe was used to turn small circular containers that had lids into lids. Boxwood is a slow-growing, thin-grained tree that has a tight grain and thin parts. Because of its close grain, this wood was ideal for fine features. This wood was often used to make double-sided, combs. Also known as pyxides, lid boxes were often made of boxwood.
Size of the lidded boxes
The size of a lidded box depends on the type of wood you use. Maple and cherry are both common choices. These two types of wood have different shrinkage rates and make great boxes. A quality box should have a minimum of three inches square and a maximum length of five to six feet. When choosing the wood for your box, make sure it is dry throughout. Exotic woods are an option for a visually appealing lid. But you need to be well-versed in the process.
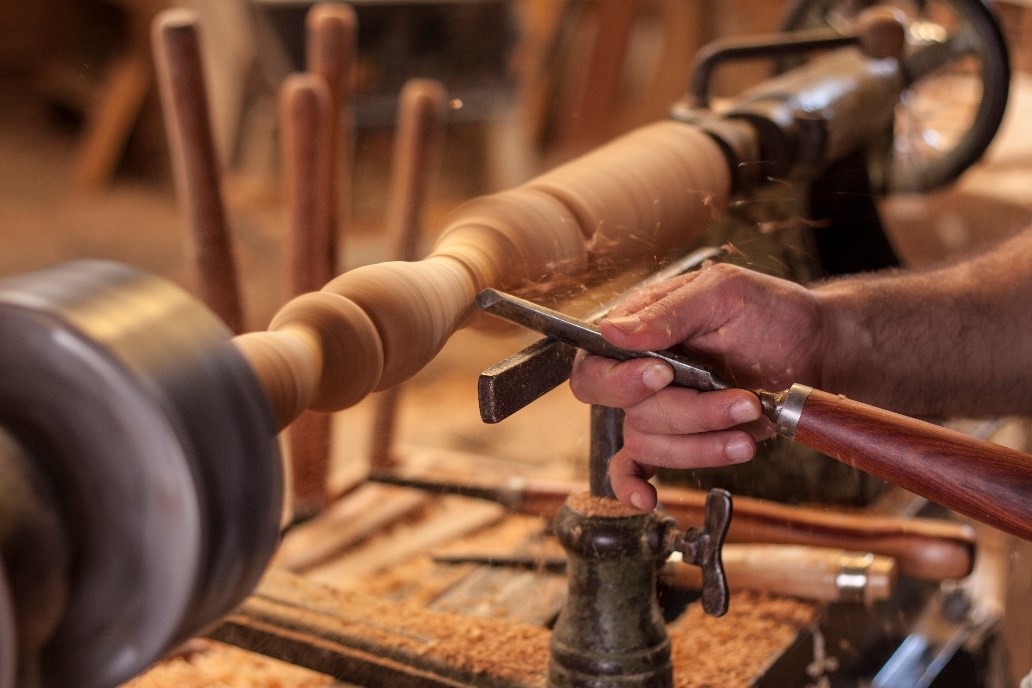
Preparing the wood is the first step. To smoothen and round the bottom of the box, a thin chamfer will be needed. Cut a V shape at the joint. Once you're satisfied with the design, you can use the spindle-roughing touge to finish shaping and finishing the rest. Before carving the lid, make sure to use a parting device to mark the bottom. Then, you can use a skew-chisel or a pencil to create a small chamfer at the base of your lid. This will soften the corner and conceal a slight circularity at the base/lid joint.
FAQ
Is it possible to refinish your own furniture?
Yes! There are plenty of ways to refinish old pieces of furniture without having to pay a pro. Here are a few suggestions:
Use sandpaper for removing stains and scratches. Use a clean cloth to wipe the surface.
Apply clear polyurethane paint. Allow to dry thoroughly before moving furniture.
Paint furniture with acrylic paint.
Instead of painting, use stain. You can give your furniture a rich appearance with stain.
Use shellac wax. The wax will add shine to the wood and protect it.
Where do I start with woodworking?
It is best to actually build furniture to learn how to make it. Although you will need to have tools and may make mistakes along your journey, you'll soon be able to master it.
You should first choose the project you wish to complete. You can make a simple box or a large entertainment center. Once you have settled on a specific project, it is time to find a woodworker in your area who is experienced in such work. Ask your local woodworker to help you determine the right tools for you and where they are located. Ask if you can find someone who does this kind work.
How do I learn basic woodworking skills?
The best way to learn how furniture construction is to make your own bench. You can use any wood you have in your home to complete this project. If you don't know what kind of wood to use, then go ahead and buy some cheap pine boards from Home Depot or Lowes. After you've constructed your bench you'll want sand all the rough edges off and varnish it.
Statistics
- Woodworkers on the lower end of that spectrum, the bottom 10% to be exact, make roughly $24,000 a year, while the top 10% makes $108,000. (zippia.com)
- Average lumber prices rose about 600 percent between April 2020 and May 2021. (familyhandyman.com)
- Most woodworkers agree that lumber moisture needs to be under 10% for building furniture. (woodandshop.com)
- The best-paid 10 percent make $76,000, while the lowest-paid 10 percent make $34,000. (zippia.com)
External Links
How To
How to join wooden boards without using nails
Woodworking is a favorite hobby. You can make useful items from wood with your hands, which is both relaxing and fun. You may need to join two pieces without the use of nails. This article will show you how to do it to make your woodwork projects look great.
Before joining the pieces of wood together, you will need to first trim any edges. Sharp corners can cause problems down the line. Now it's time to start glueing your boards together.
When working with hardwood, glue should be applied only to one side. You should glue both sides if you are working with softwoods such as pine and cedar. After applying the glue, press the boards firmly until they are completely stuck together. Before moving onto the next step, make sure the glue has dried completely.
After you have glued your boards, drill holes where you want to insert screws. Depending on what type screw you choose, the size of these holes will depend on how big they are. If you are going to use a half-inch wood screw, you will need to drill at least 3/4 inch deep.
Once you've drilled your holes, you'll want to drive the screws through the joint and into the backside of the board. Be careful not to hit the front surface of the board, or else you'll ruin the finish. Avoid hitting the screws' ends too often when driving screws. This will prevent splitting the wood's end grain.
Protect your finished project now. You can either seal the entire piece of furniture or cover the top. It doesn't matter what method you use, you want something that will last many years. You can choose from oil-based varnishes or polyurethane, shellac and lacquer as examples.
These products can usually be found at any home improvement store. It is important to ensure that you purchase the correct product for the job. Also, remember that some finishes are toxic and should never be used indoors. When handling certain finishes, wear protective gear.