There are many methods to carve a Gnome. There are some things you should know before carving. The carving process is enjoyable and rewarding. You will need to layer several layers to complete this project. It is also a great opportunity to learn how you can carve a gnome. You can also add creativity to your gnome-carving. Below are three tips to help you carve a wooden gnome.
Freehand carving a gromme
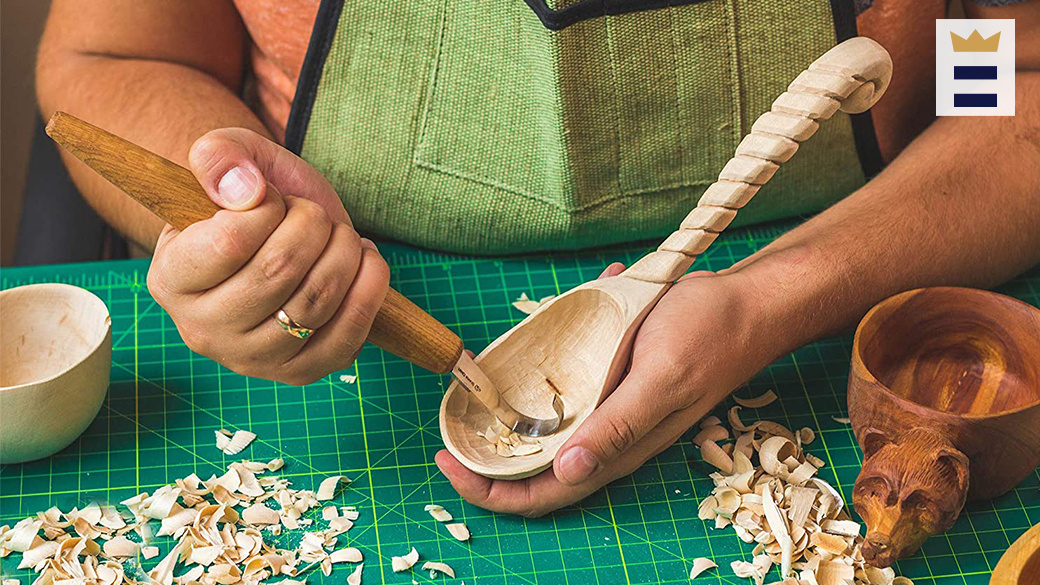
Here are some tips for freehand carving a gnome as a Christmas ornament. A knife is not necessary to carve a Christmas gnome. However, you will need a micro V tool to add details to the beard or hat rim. Fortunately, a gnome is a fairly simple carving project, and you can even carve a gnome in your spare time!
The gnome can be a great tool to show off your ability in freehand carve. They were once popular garden ornaments. Carving a gnome from wood is a great way to gauge your skill and see where you need to improve. It will also be an excellent measuring stick for design, detail, and depth. Once you're comfortable with the gnome drawing, it's time to start sculpting him.
Whistle carving is a project that every woodcarver should try.
A whistle is a great project for woodcarvers. The whistle is a simple yet useful tool that you can carve. This will make it easy to share the experience with your friends. You will need to ensure that your whistle functions well. We will be covering the entire process of carving a whistle, starting from preparation until the final product.
To begin, you will need to have a straight-edged cutting knife and some non-toxic oils. While carving a gnome might seem daunting, it's actually quite simple and will enhance your woodcarving skills. It's also one of the best beginner projects, as it will provide you with an opportunity to practice many woodcarving techniques.
Adding creativity to gnome carvings
You can make gnome carvings more creative by simply adding a hat. A wood-carved, gnome can be used as a whimsical decoration or as a sneering troll. Gnomes can add personality to your garden and can be made with a variety of materials such as stone, wood, and more stone.
Make a gnome of wood
Before carving a gnome of wood, it is important to first determine the size of the block. You will then draw the gnome's anatomy including the head, body, feet and belt. You will need to make a V-cut around the facial features to create smooth corners. Use a knife or chisel to make V-cuts at the correct places. Then, using a micro V-tool, cut out a piece of wood about 1.5mm thick. This will give you an elegant curved edge to finish your beard and hat.
A gnome carving project is very beginner-friendly. Because of the high potential to produce quality work, this is important. If you carve a gnome each week, you will see improvement in each stage. This may not be possible with every project. However, weekly carving progress will enable you to see significant improvements in design shape and facial features.
Add a Gnome to a World of Gnomes
Gnomes Of The Underdark and other RPGs have a common character: David. This character does not seem crazy. Telepathy, Can speak fluently with animals, and Can't argue with elves are his traits. He is known for putting up road signs that cause people to be confused. David and Lisa may even have a rivalry going.
Gnomes have a powerful ability to cast spells and are very proficient at manipulating arcana. They are the only race that can be played in the game. Other gnomes like the undead or leper gnomes share the same animation. Kirin Tor has always been home to gnomes. Their founding member Meryl Felstorm had a gnome as an associate of his.
FAQ
What's the difference?
Hobbyists love making things from wood while professionals are more concerned with the quality of their work. Hobbyists tend to take pride and share their creations with family and friends. Professionals will spend hours researching designs before they begin working on a project. They will meticulously plan every detail of their work from choosing the right materials to finishing it.
What's the time taken to finish a piece furniture?
It all depends on how large the furniture is. Smaller projects like boxes and picture frames can be finished within one day. Larger projects, such as desks and dining tables, can take several days. It takes time in order to properly stain or seal the wood.
How long does it usually take to complete a piece furniture?
It all depends on what type of wood you use, how complex your design is, and how much finishing you use. Hardwoods require more care than softwoods. Hardwoods can also be more costly than softwoods. But they last longer and resist moisture better. The typical time taken to finish a piece furniture takes anywhere from one to three month.
Statistics
- Most woodworkers agree that lumber moisture needs to be under 10% for building furniture. (woodandshop.com)
- In 2014, there were just over 237,000 jobs for all woodworkers, with other wood product manufacturing employing 23 percent; wood kitchen cabinets and countertop manufacturing employing 21 percent. (theartcareerproject.com)
- The U.S. Bureau of Labor Statistics (BLS) estimates that the number of jobs for woodworkers will decline by 4% between 2019 and 2029. (indeed.com)
- If your lumber isn't as dry as you would like when you purchase it (over 22% in Glen Huey's opinion…probably over 10-15% in my opinion), then it's a good idea to let it acclimate to your workshop for a couple of weeks. (woodandshop.com)
External Links
How To
How to join wooden boards without using nails
Woodworking is a hobby that many people enjoy doing. It's fun and relaxing because you can use your hands to make something useful from wood. There are times when two pieces of wood need to be joined together. This article will demonstrate how to do so to preserve the beauty of your woodwork.
You will first need to trim the edges of your wood pieces before joining them. Do not leave any sharp corners as they could cause problems down in the future. Now it's time to start glueing your boards together.
You should only glue one side of hardwood. For softwoods like cedar and pine, glue should be applied to both sides. After applying the glue, press the boards firmly until they are completely stuck together. Make sure you let the glue dry before moving on to the next step.
After you glue your boards together, drill holes at the joints where screws will be inserted. You can choose the type of screw to determine the size of your holes. For example, if you intend to use 1/2-inch wood screws, you need to drill a hole that is at most 3/4 inches deep.
Once you've drilled your holes, you'll want to drive the screws through the joint and into the backside of the board. You should be careful not to touch the board's front surface. This could cause damage. When driving the screws, try to avoid hitting the ends of the screws too much. This will avoid splitting in the wood's ends grain.
Protect your finished project now. To do this, you can seal the entire furniture piece or just cover the top. Either way, you'll want to use a product that will last for years to come. Some examples include oil-based varnishes, polyurethane, shellac, lacquer, etc.
These products can generally be found in any home improvement shop. You should make sure you are getting the right type for the job. Some finishes are toxic and should not ever be used indoors. When handling certain finishes, wear protective gear.